DIY: Origami Cube Lights
D.I.Y 2012. 9. 26. 16:18 |블로그들을 돌아보다가 예뻐서 담아요~*
아래 조명 만들기를 활용해 카페를 꾸민 곳
http://blog.naver.com/cafeuu/120146177834
DIY: Origami Cube Lights

Every year when Thanksgiving weekend (in the U.S.) rolls around, I start seeing all the holiday decor come out and I start plotting my Holiday DIY project. I’ve gone through the usual projects like the garland, wreath and candles and this year I found this project over on Wit & Whistle. It’s perfect for re-purposing the string LED lights have I have been getting bored of after putting them up the same way for a few years now.
It’s pretty simple to create; it was one of the first origami creations that I learned to make as a little girl - actually considered to be a origami balloon.
Materials:
String of lights (I would recommend using LED lights to avoid creating any fire hazards)
Square pieces of paper (in your choice of color, about 8.5″ x 8.5″)
Instructions:
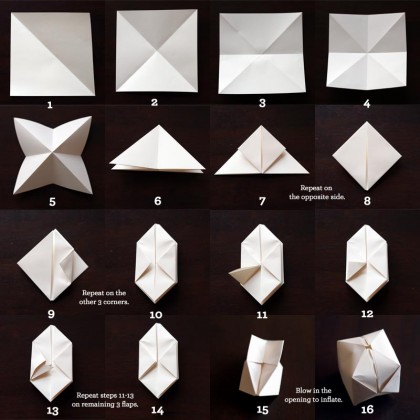
1. Fold the squares as follows to make paper cubes - click image to enlarge
You might have to tug lightly and help shape the cube while you inflate the cube.
2. When you are done folding enough paper cubes, poke each light into the paper cube. It should be pretty easy to poke through the hole seen on #16 of the instructions.
That’s it! You can also use colored LED lights or colored paper to add some color to your project. Although I do like them in the natural white and I can see getting some use out of them on my patio during the summer! Happy decorating!


